STEP ONE: First, go into the Marketplace and search for "test assets":

Click on that item and you will see that it is, in fact, a collection of items:

Buy the package of objects for 0 CC (free). We'll get back to them later.
STEP TWO: Now you need a texture to put on your object. A texture can be any image in JPEG/JPG or PNG format. You can either make one (using PhotoShop or some other graphics program like MS Paint) or you can buy one (some textures are already for sale on the Marketplace) or you can find your own on the Internet (remember to respect copyright rules!). There are some great sources for copyright-free textures on the Internet, such as:
- Torley Linden's large set of free textures at http://www.rexxed.com/2010/01/free-textures-for-second-life-opensim-and-realxtend-from-torley/
- Opensim Creations (http://opensim-creations.com/) has many, many sets of textures which you can use for free in your projects. Browse through the blog and see what you can find!
STEP THREE: Once you have your texture, you need to upload it. Hit B to go into Build mode (or click the Build icon on your cell phone). Click the Upload button on the panel on the left. You will see the following box:

Click the green plus sign and use the box to select the file from your computer that contains the texture.

Click the Upload button at the bottom. Once it is uploaded, the box will turn green and you can then exit it by clicking the X in the upper right corner.

STEP FOUR: Once you have uploaded your texture you need to create a material which uses your texture. In Build mode, hit the Create button and select Material from the drop-down menu:

You will be presented with a small box in which you can title the material. Give the material a name you will remember and hit OK.

Then you will see a bigger box,

Click the Diffuse field, and you will see the list of textures you have uploaded.

Click on the texture you uploaded in Step Three, which will then be highlighted orange, then click the Select button, and it will fill in that field.

Then click Save to close the box and save the material. You now have a material that contains the texture you want to put on your sign.
Note that once you have created the material you can place it on an object (as we will do in the following steps). Whenever you update that material, the changes to the object will be seen LIVE. In other words, you change the material and you get immediate feedback.
STEP FIVE: Stay in Build mode. If you have exited Build mode, hit B to go back into Build mode (or click the Build icon on your cell phone). In the panel that opens on your left, look for a palette (a group) of objects titled "test assets". Click on that palette/group to select it. It will then appear on your screen like this:

Click on that palette/group to select it. It will then appear on your screen like this:
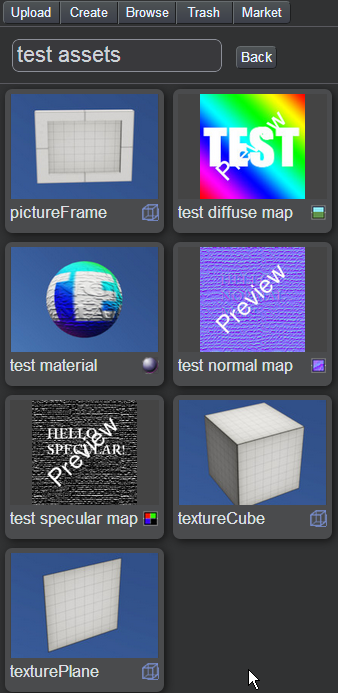
Pick the texturePlane, which we will use for our sign. We will be placing this mesh out into the world, and then saving it as a prefab. (The reason we do this is because then you can make multiple copies of the same sign.) Click on the texturePlane to highlight it in orange, then drag the mouse to where you want to put the sign:

Now resize the sign by clicking on the sign in-world, using the Scale button and dragging one of the corners to increase the size:

Adjust the sign using the Move, Rotate, and Scale buttons as necessary.
STEP SIX: Click on the Object button in the upper left-hand corner of your screen:

You will see the following screen appear:

Click on the Meshes tab to open it:

STEP SEVEN: Click the Materials tab, and you will see a slot (called lambert1 here) which is where you will specify the material that is applied to the mesh:

Click the empty field, and you will be presented will a list of materials you have already created Click on the material you created in Step Four, and it will be highlighted in orange. Then click the Select button.
NOTE: I am picking a pink knit, but it could just as easily be the words on a sign! A texture can be any image.

This will fill in the empty field with the name of the material you have selected, and it will apply the material to the sign in-world:

Now we will save this as a prefab, using the button "Save as new prefab":

You will be prompted to give your prefab a name. Pick something you'll remember so you can find it again:

You're done! At this point you should have the texture displaying properly on the sign you have created in-world, and a copy of that sign in your inventory (in a palette called "New"), so you can make duplicates.
This may seem very complicated, but it is actually a very powerful system which allows you to do things with textures and objects that you could never do in Second Life! After a while this process will become like second nature.
Lilli Thompson explains all this in more detail in the following YouTube video:
http://www.youtube.com/watch?v=-qrk5BHU-kg
*The reason we are using Lilli's pre-made objects is because they already have something called the UV textures assigned to them, which tells Cloud Party exactly HOW the texture will be applied to the object. In the case of the sign object, it will make sure that the WHOLE texture is on the sign, not just a part of it. I can't explain UV textures at the moment any better than that, sorry, I'm a clueless newbie like you!
No comments:
Post a Comment